Wednesday, May 25, 2011

around the house: frames


When we got married, Bryan and I were both wading through the morass of our bachelor degrees and jobless (maybe not the way people dream of starting, but ahhh those early days were lovely). The week after the wedding we started a new semester and went looking for work. Bryan soon found a posting for a woodworker at a gallery framemaking shop and, anxious for any job that would keep him out of a chair, he immediately took in a resume. The owner of the company was impressed by his artistic bent and sent him to the finishing department instead. Thus began eight years of clay on his clothes and gold leaf in his hair and umber in every crease of his hands.

And thus began fifteen years (and counting) of beautiful frames on our walls.


He has made frames that now hang in celebrity's homes and The National Gallery of Art and the residence of every family member whose name we ever drew for Christmas. He has framed clocks and Jacques-Louis David sketches and five year-old masterpieces. After a brief framing hiatus (it was all we could do to eat dinner during graduate school), Bryan has now commandeered the garage and Bryan Smith Frames is born. The project is in its infancy, but he will be posting photos of frames he is creating, as well as information for anyone interested in a frame of their own.

I know I am slightly biased, but he is amazing, this man of mine.


wednesday's ode

To beautiful surroundings.


Tuesday, May 24, 2011

classy shirt dress aka karate dress (a tutorial)

These are hands down my new favorite dresses to make. You start with an unwanted dress shirt and turn it into something gorgeous. Here's a tutorial that will take you from this:

To this:
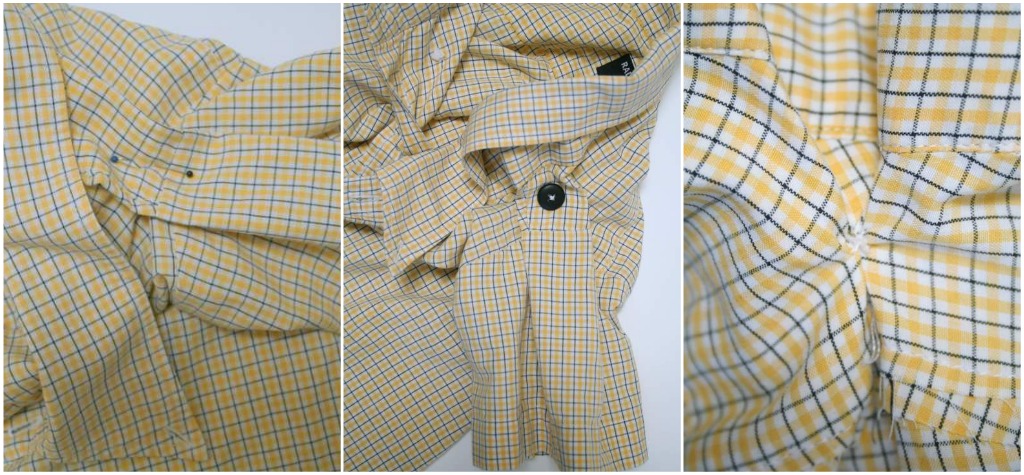
I started off with an XL short sleeved collared shirt. Any men's shirt with a collar will do. Larger sizes will give you more fabric to work with.

Using a seam ripper, carefully remove the front pocket(s). The fabric will self heal - any tiny holes from the stitching will disappear with a washing or two.
Try the shirt on your daughter and determine how much you'll need to take up the shoulders in order for the second button opening to not be too low. For my 4 1/2-year-old I took up the top 1 1/2" of the front and back shoulder, or 3" total. Also, place a pin on the shirt to mark the bottom of your daughter's knee, then add 2" for a hem.

To create the pattern, I tried a dress on her and pinned in the sides so it was slightly roomy in the chest and had a very gradual flare. The pattern should be as if you were making a sleeveless dress. You could also create a paper pattern based on a dress that seems the right fit.

Lay out the men's shirt with the shoulder seam slightly forward (as it would be if it were being worn). Place your pattern on top so that it is exactly centered over the buttons and is lower than the shoulder seams the amount that you will take up the shoulders (1 1/2" for my project).
Cut through both layers of the shirt adding an extra 5/8" to the pattern for seam allowance and length for the hem. Leave the shoulder seam and collar untouched. Remove the pattern and fold the shirt exactly in half along the buttons. Make sure the shoulder seams are even - you may want to pin them together to make sure they stay that way. Cut through both layers on the other half of the shirt using the side you already cut as a pattern. This will ensure symmetry.

Remove the sleeves from the remainder of the shirt. Lay them under the shirt so that they appear like this, making sure the shoulders of the shirt and sleeve are even. Using chalk or a fabric marker, trace along the line of the armhole and then parallel to the top of the sleeve. Then cut out the sleeve adding a 5/8" seam allowance to the armhole but not to the bottom of the sleeve. Use this sleeve as a pattern to cut out the other sleeve. If you are using a long-sleeved shirt, the process is the same, you'll just have to hem the bottom of the sleeve yourself.
Pin the sleeves to armhole of the dress, wrong sides together. Sew the sleeves to the dress and press seam. Next, pin the bottom of the sleeve and side seam, making sure to carefully match the stitch lines and armhole seams and pinning in place, again with wrong sides together. Stitch together.
Next, take up the shoulders. I did this by making what looks like the underside of a box pleat. The pleat measured 1 1/2" across, so including the underside, I took up 3". Sew a button, centered horizontally and vertically, on the box pleat. Make sure that in doing so you catch both sides of the underside of the pleat.
Measure from the button, around the sleeve, and to inside of the sleeve seam, pulling so that it slightly scrunches the sleeve. Then add 1/2". My measurement was 6". Cut two strips this length from the shirt's button placket. (I'll take finished seams whenever I can get them!) Make a buttonhole on one end that will fit the buttons used on the shoulder.
Pin these to the inside of the shoulder seam. Stitch in the ditch of the shoulder seam. Button the strips to the buttons on the shoulder seams.
Cut five pieces of fabric that are 1 1/4" x 2 1/4". These will be the belt loops. Iron each in half, then fold in the raw edges. Stitch to secure. Next, turn under the ends of the belt loop and iron. Have your daughter try the dress on and place pins just above her waistline at the locations where you will attach the belt loops (2 in front, two on the side seams, and one in the center back). Sew the belt loops onto the dress using a buttonhole stitch along both ends.
Make the waist tie by cutting a strip of material 3 1/2" x 40". I didn't have one continuous strip that was 40", so I sewed two pieces together to create enough length. Fold the strip in half, lengthwise. Sew the long edge together to create a tube. Turn the tube right side out. Tuck in the ends and press. Stitch along one of the long sides of the tie and along each short end.
Iron the bottom of the dress up 1/2", then another 1 1/2". Make sure that the two sides are exactly even when the dress is buttoned. Stitch.
And there you have it! A gorgeous dress, perfect for summertime. Now if I can just figure out some way to convince my husband to relinquish some of the bolder-colored dress shirts in his closet. I have my eye on a bright green one...

Monday, May 23, 2011

green beginnings

Our backyard isn't much of a backyard these days.

I am grateful to have any space at all, and thrilled it includes some dirt, but we do miss the outdoors of the student housing (ironic though that may sound). I miss the enormous community gardens, the boys miss the fields and woods to explore, and the younger girls miss the huge enclosed playground packed with sandboxes, climbing structures, grass, and friends.

"You know what I hate about our backyard?" the five year-old says. "Our backyard."

At our new home this sometimes-hated-but-mainly-ignored backyard is about six feet by fifteen feet, most of which is cement -- generally not the favored play surface for kids.

But we're going to make the best of it this summer, by golly.

Two weeks ago we cleared the winter debris off the dirt, which is far more clay and rock than dirt, and built raised beds. Added to the garbage-can-sized buckets a neighbor gave us and the smaller ones I skimmed from the waste pile at a local nursery, we ended up with a respectable number of dirt holders.


Then we borrowed a friend's truck and brought in the dirt.

And I have this to say about dirt: It takes a surprisingly enormous amount of dirt -- as in a-yard-and-a-half enormous -- to fill three raised beds, three large buckets, and a handful of smaller buckets. We (although not so much me) made wheelbarrow run after wheelbarrow run filling everything. A little peat moss worked in afterward, and voila.

A place to plant.

I am always surprised at how much a section of ready dirt excites me. It's a blank canvas and a clean sheet of paper and a bowl of freshly ground wheat. The day I brought out the seeds and seedlings and set them all in place I felt like I'd just accomplished something magnificent.

And I guess in a way I had. There's something magnificent in giving space to life.


Admittedly our little garden is still more cement and dirt -- more grey and brown -- than green. But even with infant plants and barren looking stretches where seeds have yet to sprout, there is a new sense of life to the place. The girls have shifted their play to the back, hauling toy animals and piles of rocks out there every day since the plants went in -- the best compliment they could pay the new digs.

Now if we could just figure out a way to fit one of these out there as well, even the five year-old might be convinced the backyard isn't so bad after all.


Friday, May 20, 2011

on slates and old-fashioned entertainment

I must admit I've been a bit obsessed with these skirts. I started out making one for my older daughter. I was so delighted with how it turned out that I had to make one for her sister as well. Then, after Allyson's enthusiasm and suggestion to add a pocket for a little notebook and pencil, my imagination started running wild. I dreamed of the girls carting around charming little slates and slate pencils and doodling on them instead of Magna Doodles; pulling them out of their pockets to keep themselves busy at church, instead of filling in a coloring book's idea of what kids want to draw (unicorns dancing on clouds, for example).

My daughter and I have been making our way through the Little House on the Prairie book series. These books are delightful and inspiring in their simplicity. When I read to her about Laura and Mary, what little they had yet how rich their play was, she is enthralled. So am I. Allyson's post on simple games made me wish that battery-powered toys, computer games, and videos had never been invented. I thrill at wooden toys and toys that encourage open-ended play. I sometimes wonder if this obsession of mine has created an exaggerated yearning in my daughter for plastic toys. A four-year-old's version of rebellion?

And another thing: it's not only the quality of the toys my kids play with that concerns me, but also the quantity. Laura and Mary were brimming with happiness when they received a stick of candy, a heart shaped cake, and a penny in their stockings for Christmas. Laura cherished Charlotte, her rag doll. Her only doll. Perhaps even her only toy.

I've put a lot of energy into keeping in check the number of toys we acquire. Sometimes I wonder if I'm being unnecessarily controlling. Does not letting my kids have a room packed with toys make me a mean mom? And when my children declare their boredom, I have second thoughts about my principles. My daughter routinely begs for trips to the dollar store - she simply wants more stuff. Is this where Americans' obsession with having, getting, and buying begins? As children with little impulse control bombarded by store shelves lined with inexpensive plastic toys?

Is obsession too strong of a word? The number of companies devoted to helping us manage and successfully organize the excess we have makes me think not.

If I can somehow teach my children to enjoy and be content with a few well-chosen toys, will that spill over into their habits as adult consumers?

Back to my slate fantasy. Slates and slate pencils, it appears, are no longer made. I looked long and hard for them and only found a few antique slate pencils on Etsy and eBay, but nothing that would work for my purposes.

So I decided to make my own little chalkboards.
 And some little pockets to hold them.
The girls doodled on them happily.
Even wore them happily.
And then frolicked in the long shadows of the evening.

Thursday, May 19, 2011

wooden rainbow arches (a tutorial)

There were some requests for a post on making the rainbow arches, but as I am thousands of miles from my dad's woodshop, this will be a tutorial without the aid of photos. This is a straightforward project but does require special tools and a fair amount of patience. But the end result is a gorgeous, versatile heirloom toy.
These can be stacked in endless combinations.
They can be a spectacular play structure for tiny toys.

They can be used as tunnels, boats, to create mazes... so many possibilities!

Materials for a 12 arch rainbow:
  •  A 14" x 7 1/2" piece of hardwood, about 2 1/2" thick. Oak, Elm or Sycamore are some suitable options.
  • A drawing compass.
  • A Bandsaw. I asked my dad if a jigsaw could be used if one didn't have access to a bandsaw. He said that jigsaws typically wouldn't be powerful enough to make smooth cuts through such a thick piece of wood - the blade would bend and result in a slanted cut.
  • Sanding equipment. I used an Oscillating Spindle Sander and a Belt Sander, but plain old sandpaper will accomplish the same thing, just a lot more slowly.
  • Craft paintbrush.
  • Non-toxic liquid paints such as liquid watercolors.
  • Beeswax Polish. I purchased mine here.
Prep: Make sure your wood is squared before beginning.
Safety: Wear safety goggles and proper ear protection when using the bandsaw and sanders. Make sure they are in proper working order to ensure safe use.

Step 1. Use the drawing compass to draw a template of the arches on your wood.

Mark where the midpoint of the bottom of your board is.
  
 Place the point of the compass on the midpoint and draw a semi-circle with a 1" radius.
 Keeping the compass on the midpoint, increase the distance 1/2" at a time and draw a series of arcs, 12 total.
half template
 Step 2: Cut along the arches using the bandsaw.
  • Cut away the outside portion first.
  • Go slowly and steadily for smooth cuts.
  • Instead of simply pushing the wood through the blade, think of yourself as rotating the wood around the blade. This will help your cuts be smooth and your arches be uniform.
  • Start with the largest arch and work your way down to the smallest arch.
Step 3: Sand the arches
  • If using power sanders, gently and evenly rotate the arches along the sander.
    • Use a table belt sander to sand the outside of each arch.
    • Use an oscillating spindle sander to sand the inside of each arch.
  • If using sandpaper
    • Start with the coarsest grit (60) and sand all surfaces of the arches.
    • Use progressively finer grit (higher number) sandpaper on all the arches up to at least 220 grit.
  • Wipe the sawdust off the arches
Step 4: Paint/Dye the arches
  • If I had more time and more know how, I would have attempted to dye the arches using natural substances (e.g. berries, roots, etc.). I found some interesting tidbits about dyeing wood online, but decided to go the easy route and use paint in the interest of actually finishing this project!
  • I wanted the wood grain to show through the paint, so I thinned it a bit with water before applying it to the wood. I applied paint and let it dry, then applied more layers as needed to get the look I wanted. Because I allowed the grain to show through the colors were somewhat muted, but I liked the end result. Using more opaque paint would ensure brighter colors.
Step 5:  Protect with beeswax.
  • Apply beeswax with a soft cloth, working it into the wood.
  • Let dry.
  • Apply additional coats as desired
  • To maintain your arches, periodically reapply beeswax.